

Skirts are easy, right? Well, yes and no. Like many, I started with a skirt that was a few straight panels sewn together, then pleated. While I do believe this was one method of making skirts in period, I believe professional tailors did it a different way. The more research I did, the more I realized that tailors used a more elegant draft that allowed for fullness at the hem, with less over the hips. I’ve seen many examples of circles and gored skirt patterns in the pattern manuals if the day. Over the years, I have tried to figure out a way to create a pattern draft. The modern drafting methods never really had the same drape as what I was seeing in the period depictions. Then one day, it hit me…a gore is really just a part of a circle. So, I fished out a protractor that had been buried in my drawer of rulers and I started measuring the skirt angles I was seeing in the period drafts. After some experimentation, I found I really like a skirt with a hem sweep based on 30 degree angle. The following draft is my simplified version of how to create a period gored skirt using simplified geometry.
Step 1: You will need to take two measurements:
1. Waist circumference
2. Skirt Length

Step 2: Use those measurements to do some simple calculations:

- Decide on the amount of fullness you would like at the waist. If you would like a skirt without any pleating, you would add nothing.I would recommend using either 1.5, 2, 3 or 5 times the waist for your fullness. For my middle class “german” skirts, I like to use 2 times my waist for fullness.
- Take your waist measurement, and multiply it by the amount of fullness. So, I take my waist of 7.5 and multiply it by 2 to get 14.5
- Take the final waist measurement and divide that by the number of panels in your skirt. This draft is based on using 4 panels, so I take the 14.5 from the previous step and divide by 4 to get 3 5/8. Now, Add .5 to this measurement. This is going to be your drafting waist measurement.
Step 3: Begin the draft: Get out a large sheet of paper. The length of the paper will need to be long enough for your skirt length plus double your drafting waist, plus another 5 inches. On the paper, draw a vertical line down the left side of the paper, then square out a line from the top of that line, the width of your paper.

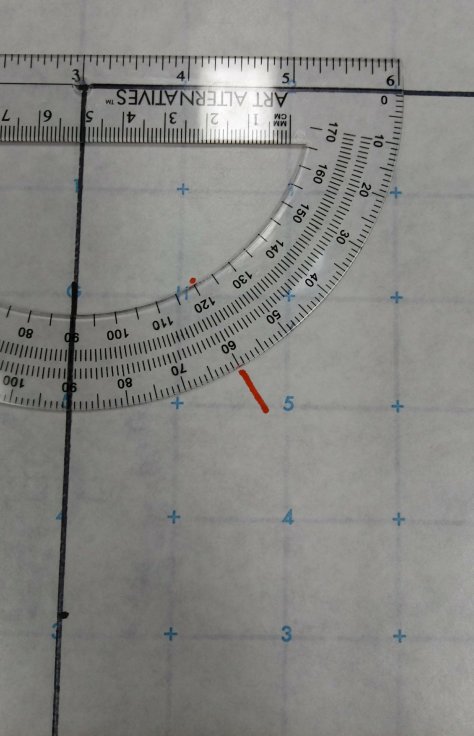
Step 4: Draw your skirt sweep angle:Get out your protractor, and place it on the two lines you have just drawn and mark out 30 degrees from the length line we drew on the left side of the paper. Draw a line representing that angle.

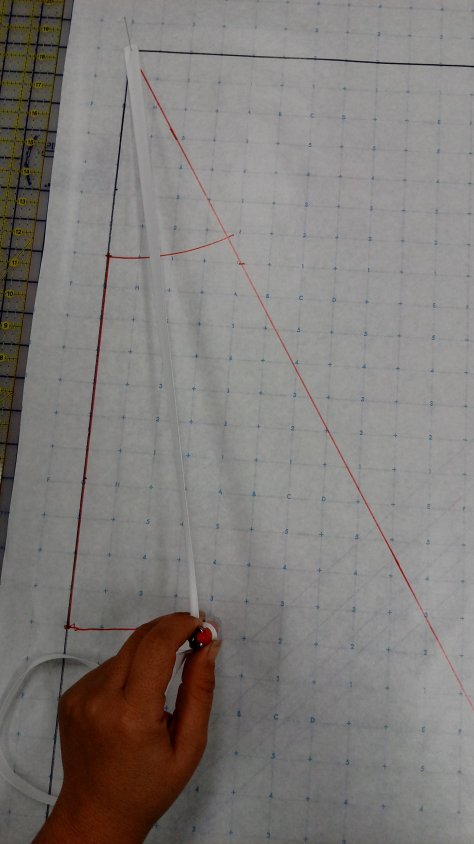
Step 5: Find your waist placement: Place your ruler on the length line running down the right side of the paper and slide it down until the distance between that line and the diagonal is equal to your drafting waist measurement.

Step 6: Draw your waist curve: take a cord or ribbon and pin it to the point of your angle. Tie a pen or pencil at the length that corresponds to the point you just marked, and draw a curve, stopping at the other line.


Step 7; Mark your hem length: starting at the waist mark on the line to the left of your paper, measure down the length of your skirt and mark.

Step 8: Draw your hem arc. With the ribbon still pinned at the point of the angle, tie your pen or pencil at a length that corresponds to the mark you just made. Make sure to hold your pen straight up and down, and draw your hem arc.

Step 8: Add your seam allowance if you wish, and then cut out the pattern. You will need at least four of these for your skirt. The line at the left can be either a seam or a fold. So, you can cut 2 on the fold, or one on a fold, then two more on a seam, or 4 on a seam.

